
We learned previously on the xAI blog series how to access the gradients of a class probability with respect to the input image. With that, we got a hint of what an AI is actually looking at when doing a prediction. Unfortunately, the resulting saliency maps weren’t too comprehensive. We need to refine them a little.
What do the gradients mean? A huge gradient indicates that the pixel was important for a class prediction. But what about small and negative gradients? Sticking to our argumentation, a negative gradient contradicts the class prediction. And hence the pixel suppresses/contradicts a specific prediction.
Those pixels can be ignored since we are only interested in what the AI finds important. Let me introduce Guided Backpropagation to you.
Deeper dive into Vanilla Backprop
During backpropagation, we have to undo all convolutions. This is basically an inverse matrix multiplication (Understanding transposed convolutions – MachineCurve). That’s the easy part. In most AI architecture, Rectified Linear Units (ReLUs) are used as activation functions.
A ReLU function dismisses all negative values and sets them to 0. In particular, this means that the gradients for all negative values are also set to 0. And this we have to remember during the backward step.
Assuming, we have a feature map be fed forward through a network. At some time, it will pass the ReLU function. At that point, all values smaller than 0 are dismissed (red squares). When doing backpropagation, we have to remember (to be honest the AI framework) the layer and the position of the flatten values and also set them to 0.
Deconv and Guided Backpropagation
Deconv now applies the aforementioned interpretation of the gradients (negative gradients = suppression, positive = relevant). It applies a ReLU in the backward pass and dismisses the negative values (yellow squares). When we only do this, we still get a very noisy saliency map.
The thoughtful reader, of course, knows immediately the reason for the noisy maps! This is due to that we totally forget about the dismissed ReLU values from the forward step (red squares…!).
Basically, we now get a superposition of all visual structures that could lead to a fish prediction. This, so-called deconv technique, is nevertheless useful: It can give us an idea of what a certain neuron/class is generally reacting to.
Guided Backprop combines vanilla backprop with deconv. We applied a ReLU function in both directions: forward and backward pass. And voila: In the saliency map, we have a clear view of a fish-like shape. Fins and heads are slightly more highlighted.
Please provide code!
Building on top of our first blog entry, we continue using the DenseNet 201 pretrained on the imagenet data set. This time, we have to modify our networks a little bit. We will change the default ReLU derivatives so that we only keep the non-negative values from both directions. The game plan is:
- Implementing our own guided ReLU function
- Replacing all old ReLU functions in the AI model
- Perform the extended backpropagation in the 1st part of this blog .
For this tutorial, we assume you worked through the first tutorial and have the code.
Guided Backpropagation in code – TensorFlow
Try it yourself: You can download the code from our GitHub repository or try it directly in Colab. Please feel free to comment!
The first step is to implement our own gradient function for the backward pass:
@tf.custom_gradient
def guidedRelu(x):
    def grad(dy):
        return tf.cast(dy>0,tf.float32)  * tf.cast(x>0,tf.float32) * dy
    return tf.nn.relu(x), grad
We use the @tf.custom_gradient decorator to implement our own new “guidedRelu” function. The decorator expects a pair of a function and its differentiation function. As we only to modify the differentiation, we can use TensorFlow’s implementation of the ReLU function. Therefore, nothing to change here, and we return the vanilla, unmodified ReLU-function. The differentiation function is a bidirectional ReLU function. Therefore dy from a deeper feature map is only passed through if it is greater than 0 and the initial feature map x from the forward pass was also greater than 0.
layer_dict = [layer for layer in test_model.layers[1:] if hasattr(layer,'activation')]
for layer in layer_dict:
    if layer.activation == tf.keras.activations.relu:
        layer.activation = guidedRelu
        print("changed")
The next step is to identify all vanilla ReLU functions and replace them with our own guidedRelu function. A small heads-up here: We are explicitly looking for instances of the tf.keras.activations.relu implementation. This should be the default implementation of recent repositories. Unfortunately, TensorFlow has multiple ReLU implementations such as:
- tf.nn.relu
- tf.keras.layers.ReLU
So, you probably have to change that…
Now, we can return to business as usual. With tf.GradientTape() we get the saliency map. Just like before.
with tf.GradientTape() as tape:
    tape.watch(input_img)
    result = test_model(input_img)
    max_score = result[0,max_idx[0]]
grads = tape.gradient(max_score, input_img)
And we get pretty neat maps.
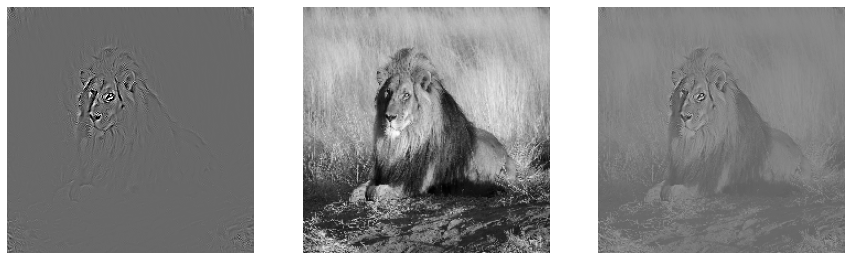
Finally! A comprehensive saliency map! We can clearly see what the network was focussing on. The most relevant image features are located around/within the lion’s head. This is also a coincidence with our intuition.
Guided Backpropagation in code – PyTorch
Try it yourself: Of course, all the code is also provided at GitHub and Colab!
Let’s move on to PyTorch. We stick to our game plan: First we implement our custom guided backprop gradient function:
def relu_hook_function(module, grad_in, grad_out):
    if isinstance(module, torch.nn.ReLU):
        return (torch.clamp(grad_in[0], min=0.),)
PyTorch has a slightly different philosophy than TensorFlow. Instead of defining a completely new function with its differentiation form, you rather modify an existing one. The instrument herefore are hooks. For a deeper dive into how hooks work you can have a look here.
Using this vehicle, we only have to add that all negative values in the backward pass shall be dealt with…
Similarly, we now have to find all ReLU functions and modify them with our hooks:
for i, module in enumerate(test_model.modules()):
    if isinstance(module, torch.nn.ReLU):
        print(test_model.named_modules())
        module.register_backward_hook(relu_hook_function)
And we are all done and set! Now, we run backprop again and have a look at the saliency map!
image = prep_input("lion.jpg")
out = test_model(image)
best_id = decode_output(out)
out[0, best_id].backward()
gradygrad = image.grad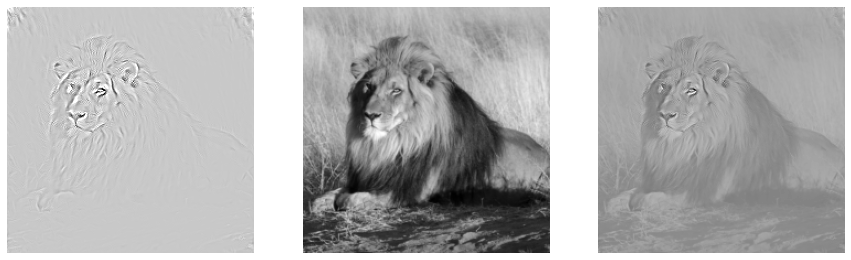
Not bad, isn’t it? Like the TensorFlow one, the network focuses on the lion’s face.
TL;DR
- Guided Backprop dismisses negative values in the forward and backward pass
- Only 10 lines of code is enough to implement it
- Game plan: Modify gradient => Include in the model => Backprop
- Clear and useful gradient maps!


2 thoughts on “Guided Backpropagation with PyTorch and TensorFlow”
In the pytorch implementation, why do you clamp grad_in? Should you not clamp grad_out as these are the gradients you want to pass to the next layer?
Basically, you define what the grad_out is in the function: grad_out = ReLU(grad_in). Therefore you have to clamp the grad_in values.