

This 10-step grey-box pentest strategy has proven to not only be effective but also efficient – as it uses a minimum number of test cases to cover a large range of vulnerabilities with minimum false positives! We, from Vector Consulting, took it into our hands to lay down an actionable risk-oriented step-by-step grey-box pentesting procedure. This 10-step cookbook recipe from a security engineer’s perspective is to be applied along the entire lifecycle of the product.
Why is a pentesting strategy necessary?
“In today’s connected vehicles, safety and security are one and the same” rightfully stated GM President Dan Ammann. A good pentest strategy is the need of the hour to combat the rising cybercrime. ISO 21434 lays the foundation for a good security process framework, however, no guidance regarding security testing.
It has been also quite daunting for the OEMs to streamline their automotive security testing processes, as less to nothing is mentioned in the current standards! There are no ISO standards that talk about how to perform a penetration test. There are open guidelines from NIST, OWASP, PTES (Penetration Test Execution Standard) to name a few but all are very black-box centric focusing more on IT and web-application security and no stress upon the implementation steps.
My previous article – Security testing techniques to combat cybercrime – introduces grey-box pentests and the ingredients for good security testing. Learn about the difference between black-box to grey-box pentesting. Now we deep dive into the 10 steps on how to realize that.
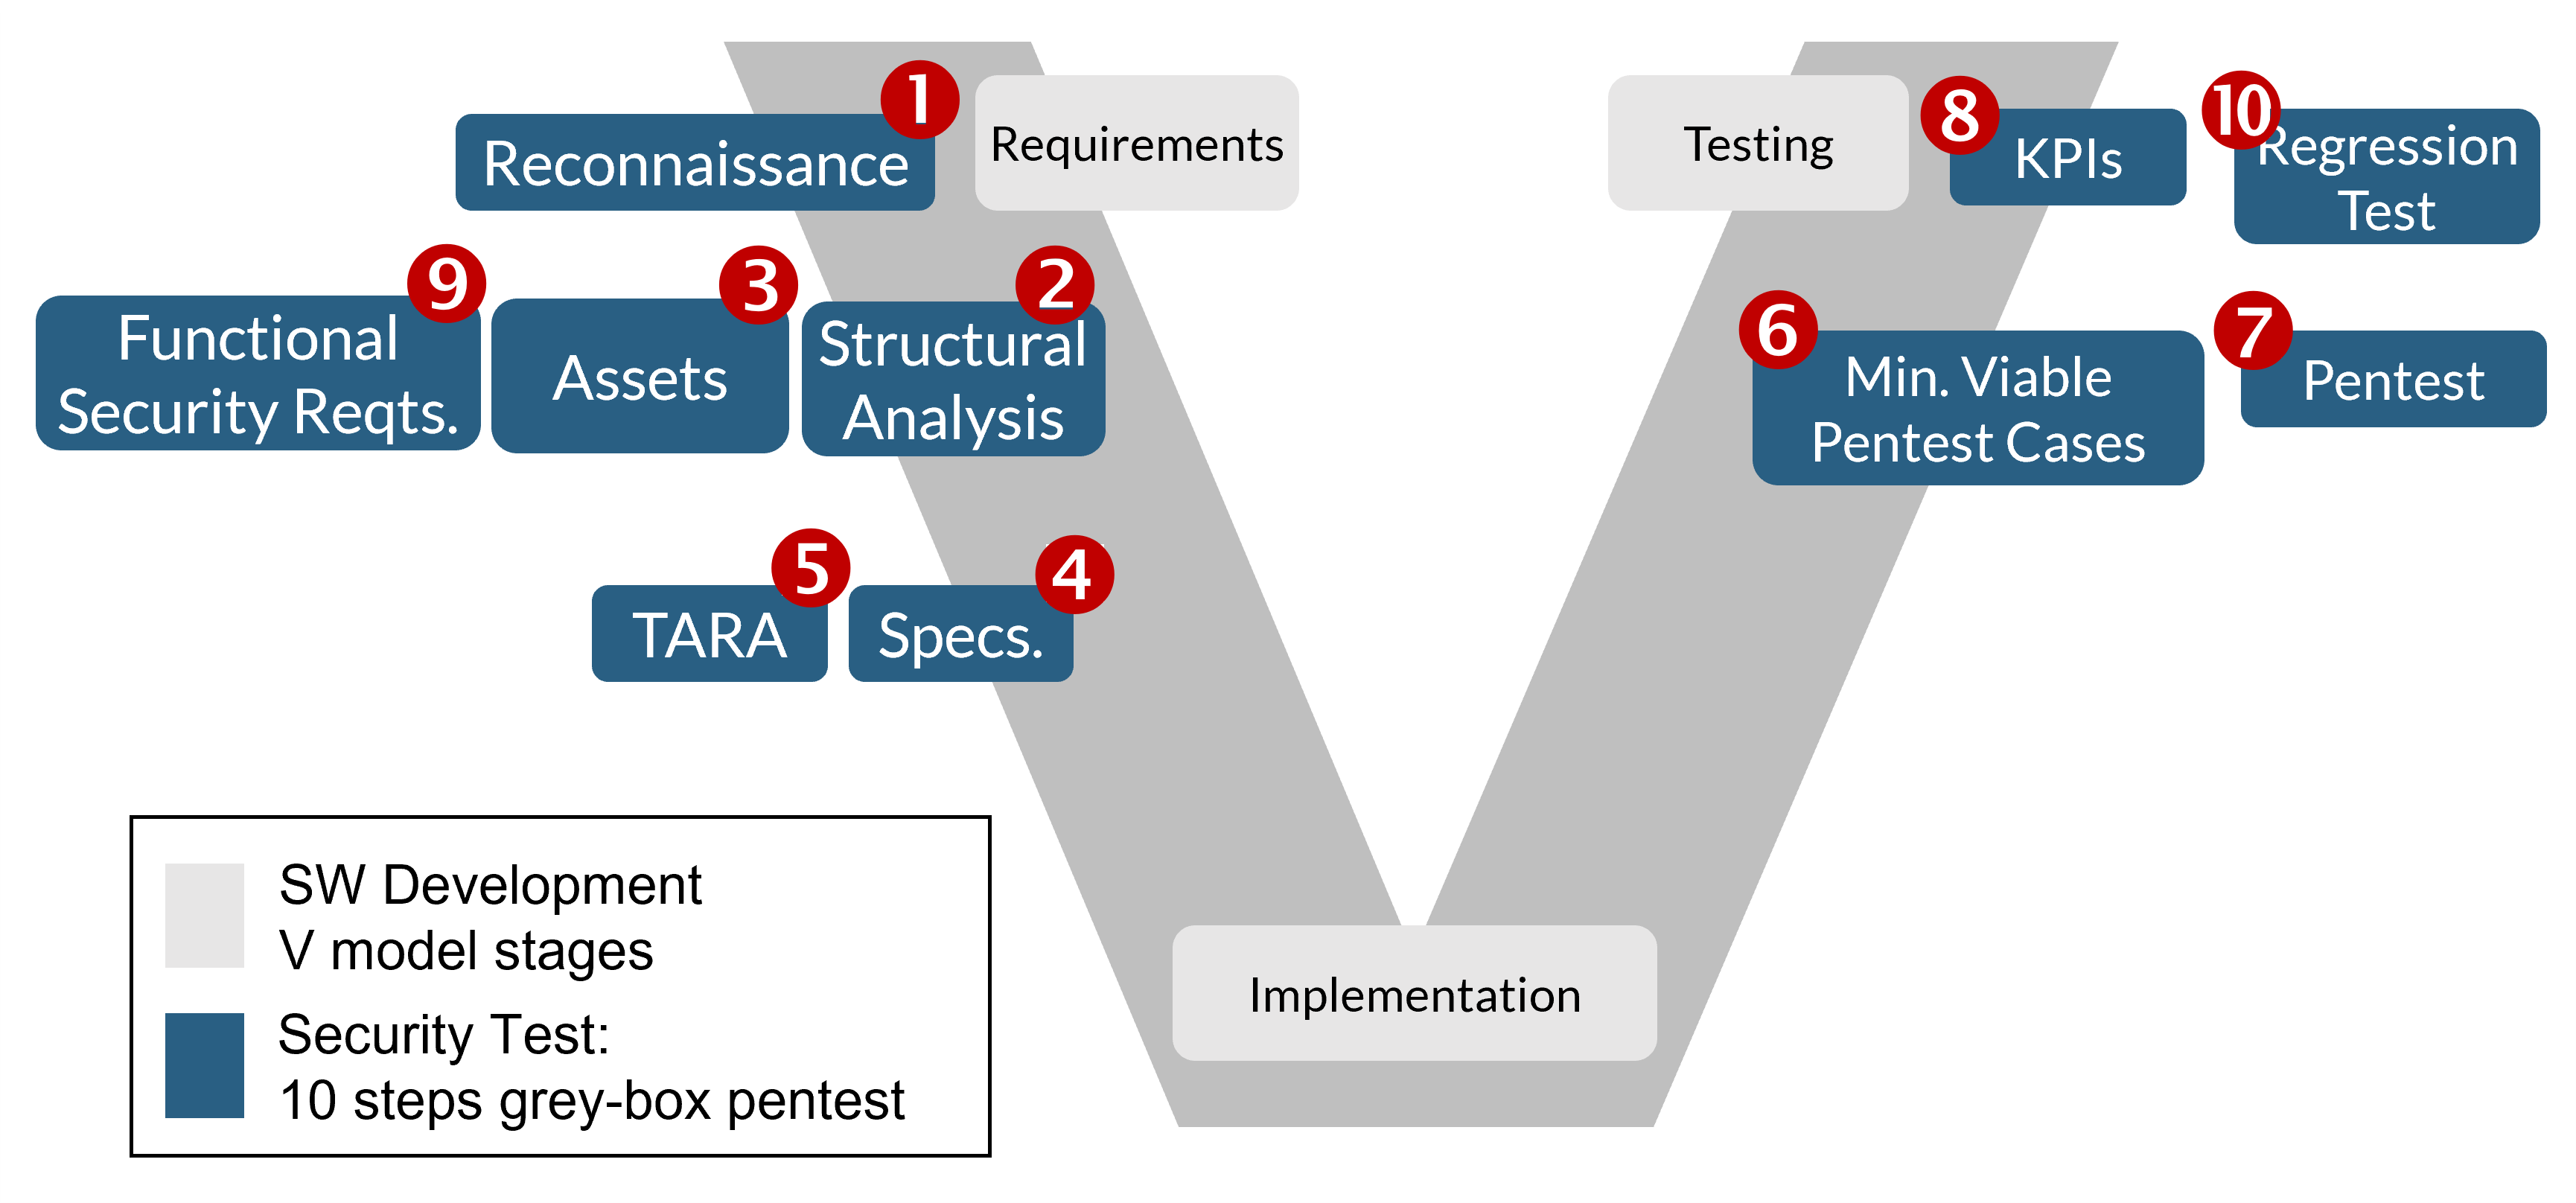
Step 1: Reconnaissance for efficient grey-box pentests
As a first step for successful pentesting, we need to extract the system information and analyze the basic features, user goals, target group, product description, and cybersecurity impacts. For instance: Unintended or prevention of airbag deployment. We perform active and passive reconnaissance to gather as much information about the device such as actively ping probing the MCU, port scanning. Passively via market requirements, user manuals, legally published material etc. This scoping activity is vital because, the more you know about the device, the more reliable is your pentest result.
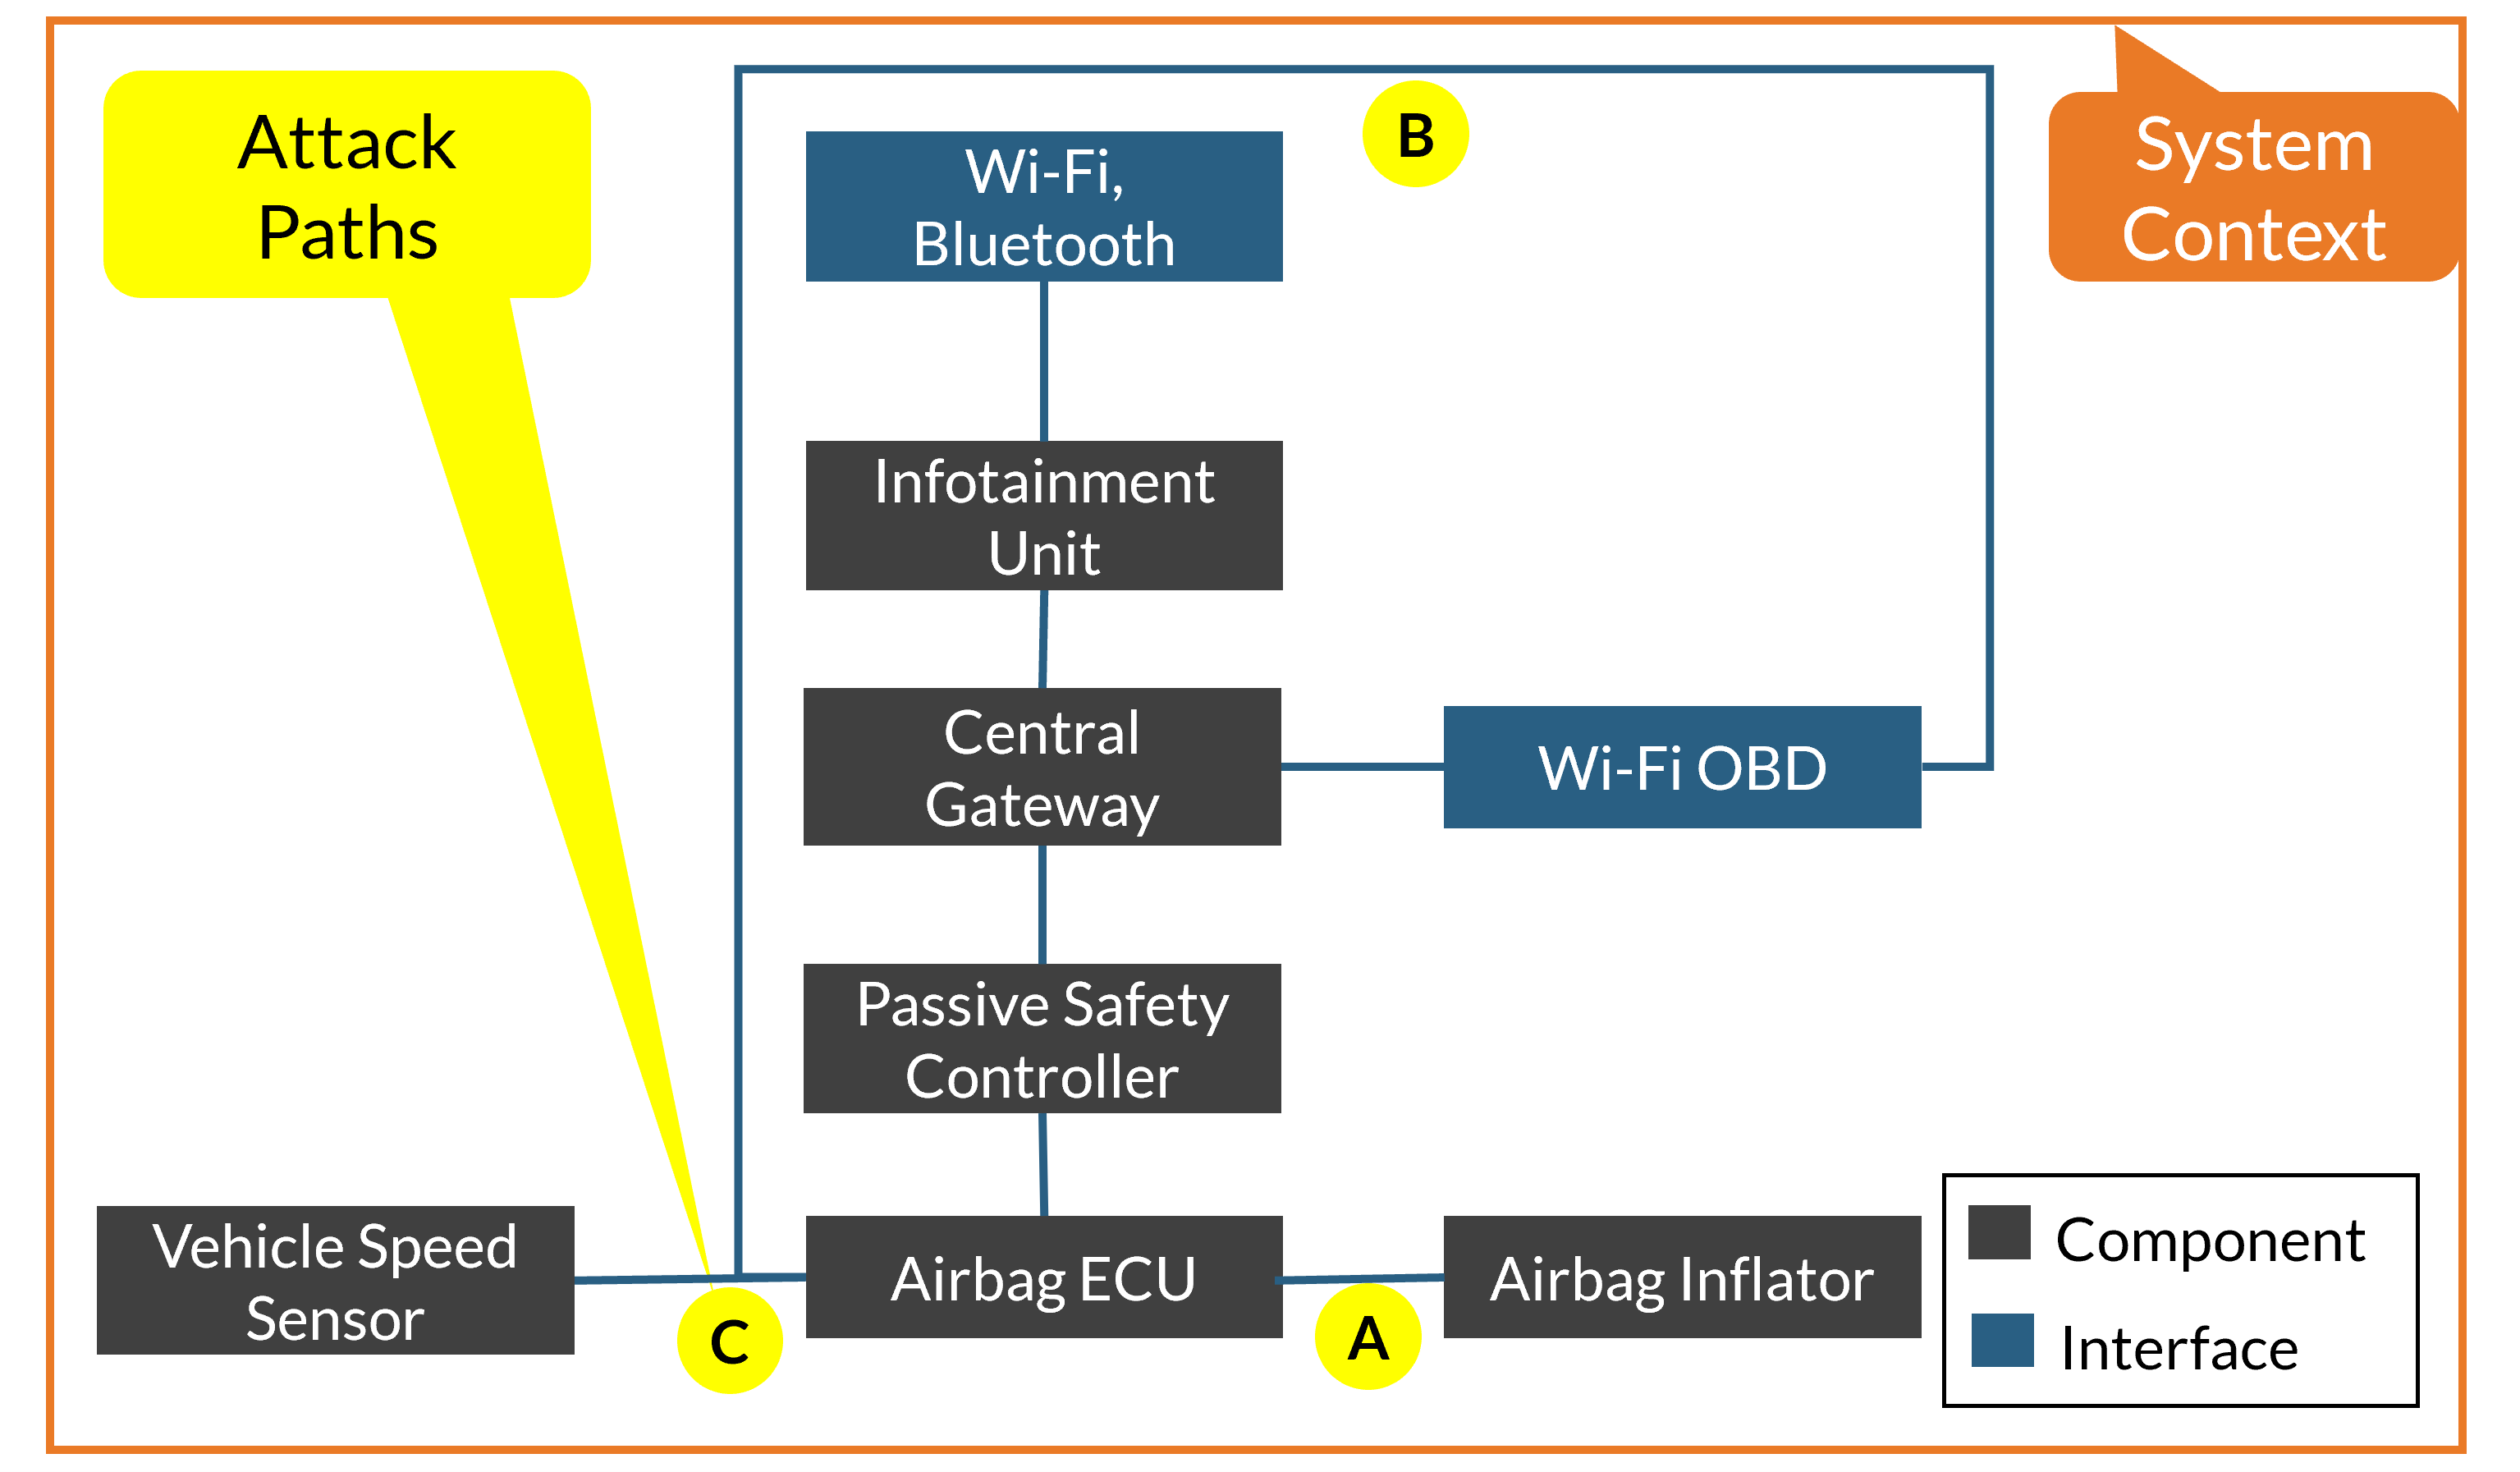
Step 2: Structural analysis
We analyze the high-level architecture schematics and perform a structural analysis to understand the system context, the interaction between the various components, and its outside world via the interfaces and attack pathways.
Step 3: Asset elicitation
From the architecture schematics, high-level product requirements are traced to elicit the valuable assets based on the Safety, Finance, Operational Performance and Privacy (S, F, O, P) scheme e.g.: Hardware, software – critical CAN frames (e.g., Airbag deployment diagnostic signal, vehicle speed, brake pressure signal), proprietary information, etc.
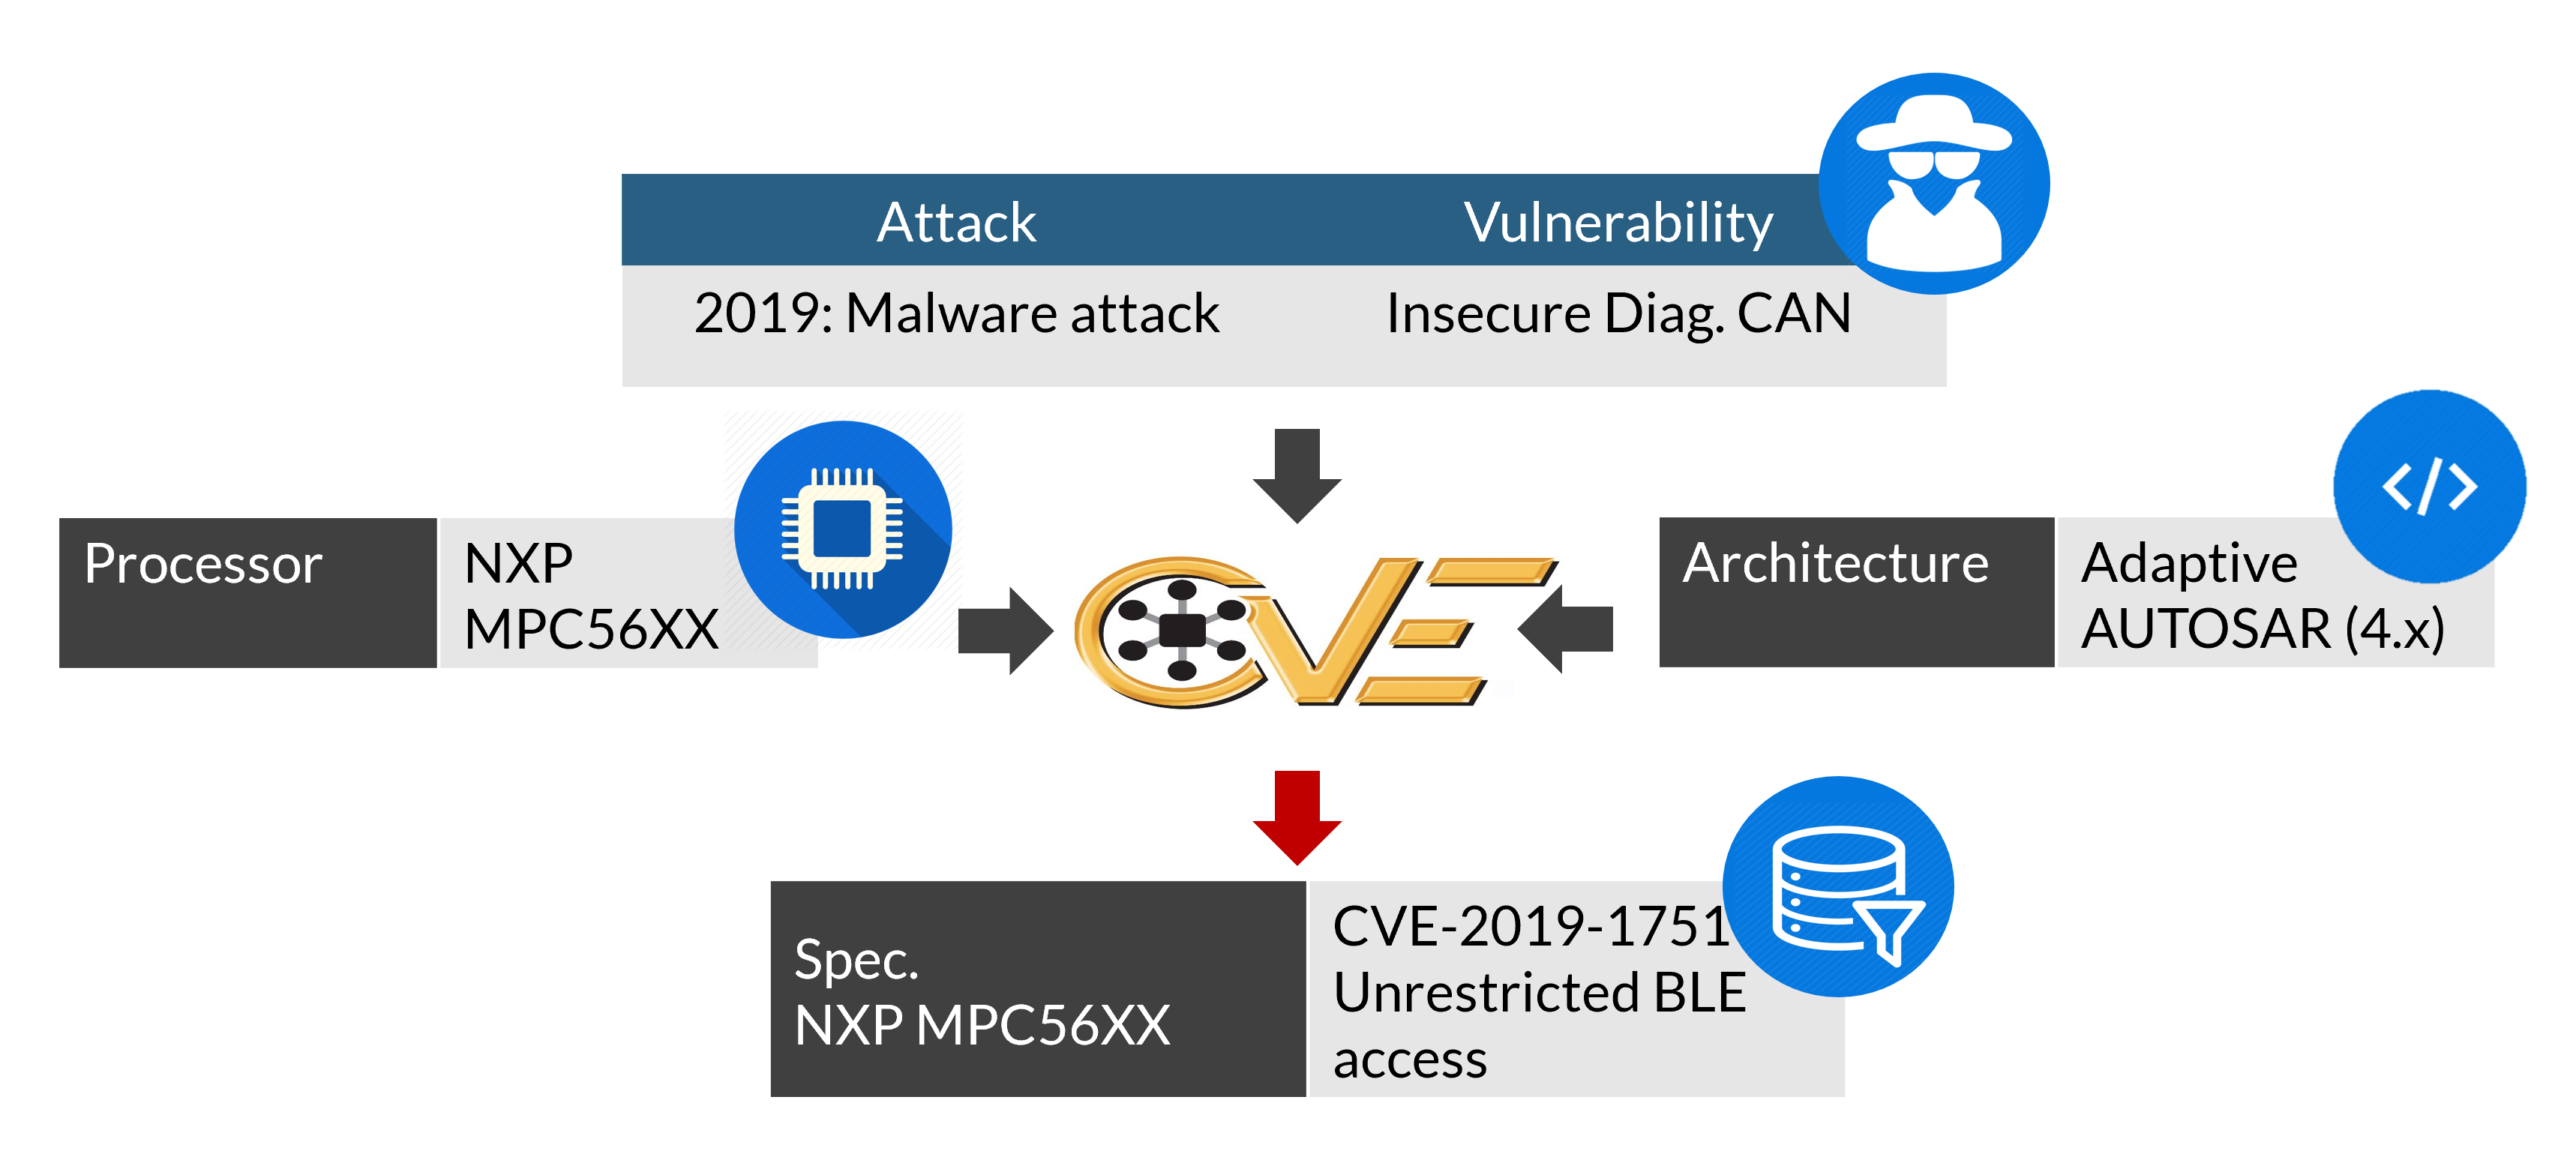
Step 4: Specifications
We analyze the product requirements, the CE (European conformity) verification documents, and processor datasheets to obtain the hardware and software specifications. This data along with the attack history is fed into vulnerability databases such as Common Vulnerabilities and Exposures (CVE) to find out the publicly known vulnerabilities associated with the specifications. This step helps to enrich our step 5: Threat Analysis and Risk Assessment (TARA) to enumerate all possible threats.
Step 5: Threat Analysis and Risk Assessment (TARA)
We create a mini-TARA that helps to derive the penetration test cases, which is the essence of a grey-box pentest. We follow the top-down approach starting with the assets followed by the corresponding damage scenarios, threat scenarios, and finally the attack pathways. Based on the threat level and impact level, the risk level is determined for every threat.
Step 6: Minimum viable penetration test cases
We select the high-risk threats (risk level: 4 and 5) from the TARA to generate minimum and non-redundant pentest cases. The attack pathways corresponding to these threats act as pentest cases.
Step 7: Penetration test
To recreate the attack scenario on the device to identify if potential vulnerabilities as enumerated in TARA are valid or invalid.
- Interface Discovery: All available hardware interfaces are determined, and preliminary tests are performed to detect target responsiveness with port scanning tools like Nmap and Zenmap.
- Network Discovery: Network traffic is analyzed to determine protocols, communication formats and determine the baseline behavior with network analyzer tools like Wireshark.
- Network Penetration Test: Network-based attacks are mounted using low-level access to the bus with forged frames using tools like Metasploit, Scapy, etc.
- Software Penetration Test: Software is manipulated in terms of unauthorized read and write to check if corrupted flashware or deletion can be executed. Flash dumps are parsed for sensitive information and checked if existing security mechanisms can be bypassed.
Step 8: Key Performance Indicators (KPIs)
Unmeasured performances do not improve!
- Test Effectiveness KPI – Fault Detection Rate: This determines the number of seeded faults discovered out of the total number of seeded faults injected into the system.
- Test Efficiency KPI – Vulnerability Discovery Average: This determines the average number of vulnerabilities found per test case.
Step 9: Functional security requirements
Functional requirements are enhanced to address the valid vulnerabilities identified in step 7. Robust security countermeasures are added to make the system more secure.
Step 10: Regression test cases
After applying the security update in step 9, we perform steps 2 to 6 again and conclude the iterations when the total valid vulnerabilities are as low as possible. A clean-up activity is performed to ensure the system is free of executables and configured back to its original state.
Grey-box pentest enhancements
This strategy can be automated for optimization and directly extract the minimum test cases from the design models, architectural heuristics, threat catalogs, and machine learning models.
Conclusion: Limits of grey-box pentesting
Methodology is key to achieving reliability. As the famous adage goes – “If you fail to plan, you are planning to fail” – Benjamin Franklin. However, there are threats to validity that cannot be avoided. The technical competency, in other words, the experience of a pen tester decides how accurate the test result is. Constraints, as legal regulations, improper test environment, tool inefficiencies could also compromise the validity of a test outcome and need to be also factored in before performing a pentest.
Further readings and video
- Security testing techniques to combat cybercrime – Coders Kitchen (Pre-cursor to this blog article)
- Penetration Testing for Automotive Cybersecurity: Ebert, C., & Ray, R. (2021). ATZelectronics worldwide, 16 (6), 16-22
- Enhanced Penetration Testing for Automotive Cybersecurity: Ebert, C., Ray, R., John, J., & Wang, Z. (2022). SAE Technical Paper
- Toward a Formal Traceability Model for Efficient Security Validation. Ebert, C., & Ray, R. (2021). IEEE Computer, 54 (11), 68-78